How to Choose Your Size
Welcome to your Cashmerette pattern! Whether this is your first time making a garment with a Cashmerette pattern, or your body has undergone changes since the last time you measured yourself, we’re here to help you find your ideal size or set of sizes.
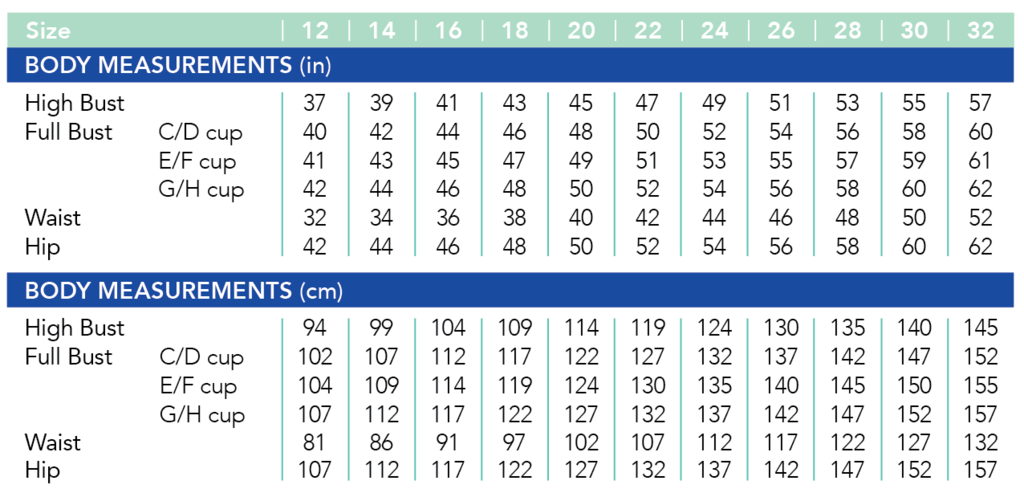
Start by measuring your high bust, full bust, waist and hip:

Compare it to the body measurements chart below. If you fit into different sizes at your bust, waist or hip you can grade between the sizes to make a custom-fit size that will fit you. You can also reference the finished garment measurements chart to see the actual size of the garment—but bear in mind that there is negative ease in knit garments, so the garment may be smaller than your body measurements by design.
Cashmerette’s Calder Pants & Shorts pattern includes the apple and pear pelvis fit options. That way, you don’t have to worry about choosing your pelvis fit before getting the pattern, and if you try one pelvis option and decide you need the other instead, you already have it!
One important thing to keep in mind: the tummy fit is the same for both pelvis fits. The differences between the two pelvis are in the waist to hip curve and in the back.
Our two pelvis fits have slightly different measurements, which you can see in the size chart for the pants patterns. For example, here’s the size chart for the Calder Pants & Shorts:

This should help you identify your pelvis fit based on your measurements, but if you’re still not sure, here are some tips:
The Apple Pelvis Fit
You are likely going to be best in the “apple” pelvis fit if:
- Typically, you find pant waistbands are constricting, and the back bum/thigh area is a bit baggy.
- Typically, pant waistbands cut in when the pants fit your hips.
- You have a straighter hip curve rather than a very curved one.
- You have a low hip-to-waist ratio.
Here you can see that the “curve” between Andrea’s waist and hip is pretty minimal–she has a proportionately large waist and small hips. We used the apple pelvis fit for her Calder Pants.

The Pear Pelvis Fit
You are likely going to be best in the “pear” pelvis fit if:
- Typically, you find that pant waistbands gape at the back, but are tight through the hips. Conversely, when pants fit you in the hips, the waistband is much too big.
- You have a very curved hipline.
- You have a higher hip-to-waist ratio
Here you can see that Dawn has a more pronounced curve between her waist and her hip. We used the pear fit for Dawn’s Ames Jeans.

Still not sure which pelvis option to choose?
Here are some additional thoughts:
- It’s always a good idea to make a muslin first! And remember to baste your side seams before you do final stitching/top-stitching, so you will have time to make adjustments.
- Grading between sizes is always an option, so don’t worry if you’re “more of an apple” or “more of a pear” than the pants are designed for.
- If you make the pear shape pelvis, you can always take it in at the hips later when you baste.
- If the existing Cashmerette waist/hip ratio usually works for you, the apple is likely to fit you best.
- If you’re an hourglass with a defined waist, then you’re probably going to be the pear.
- Remember, most of us have to make some adjustments to most patterns. Pick a fit as a good starting point, but you’ll likely have to make further changes, so don’t get too worried about having a perfect fit right away.
We hope that helps you choose your ideal pelvis fit!
Information sourced from Cashmerette Patterns.